Post #21
|
Monday, 20-May 2013 @ 9:35am
Looking good mate.
Ā
I'd go for white if anything.
Ā
I'd go for white if anything.
.jpg) Thanks 1000Deluxe, the white is the one I was leaning towards. Just have to get down to a few car dealers and look what's around, but an off white metallic is what ĀI'm looking for and with an interior with seats trimmed like pic would look awesome. So off I go to look at some colours, probably come back with a totally different idea but will try and stay on track. One thing I know is I'm hanging to get it back on the road after 7 yrs of having no Datto!
Thanks 1000Deluxe, the white is the one I was leaning towards. Just have to get down to a few car dealers and look what's around, but an off white metallic is what ĀI'm looking for and with an interior with seats trimmed like pic would look awesome. So off I go to look at some colours, probably come back with a totally different idea but will try and stay on track. One thing I know is I'm hanging to get it back on the road after 7 yrs of having no Datto!
.jpg)
.jpg)
.jpg)
.jpg)
.jpg)
.jpg)
.jpg)
.jpg)
.jpg)
.jpg)
.jpg)
.jpg)
.jpg)
.jpg)
.jpg)
.jpg)
.jpg)
.jpg)
.jpg)
.jpg)
.jpg)
.jpg)
.jpg)
.jpg)
.jpg)
.jpg)
.jpg)
.jpg)
.jpg)


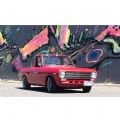
 1967 Datsun B10 2 Door.
 1967 Datsun B10 2 Door.
.jpg)
.jpg)
.jpg)
.jpg)
.jpg)
.jpg)
.jpg)
.jpg)
.jpg)
.jpg)