35 Posts - Page: Previous | 1 | 2

Has anybody made their own door cards?

Ash,
 
I found that when i have done some internal car trimming, that the est stuff to use is the brush on contact cement and use it very thinly. This is the stuff I have used in the past and had good success with.

You dont need as much glue as you think. In fact, when I did my overhead console in my patrol, i didnt use any glue at all. I simply pulled the carpet tight and then stapled it back. i also have done a similar thing with the jukebox i have made. Nobody has ever mentioned to me that my trimming lacked glue or was mis-shapened. By not using glue at all, you can pull the carpet, or vinal in this case to the right tension at all angles.
 
You have to be careful as plenty of glues will affect how foams will behave, Some will dissolve foam, or soak thru as you have already found.
 
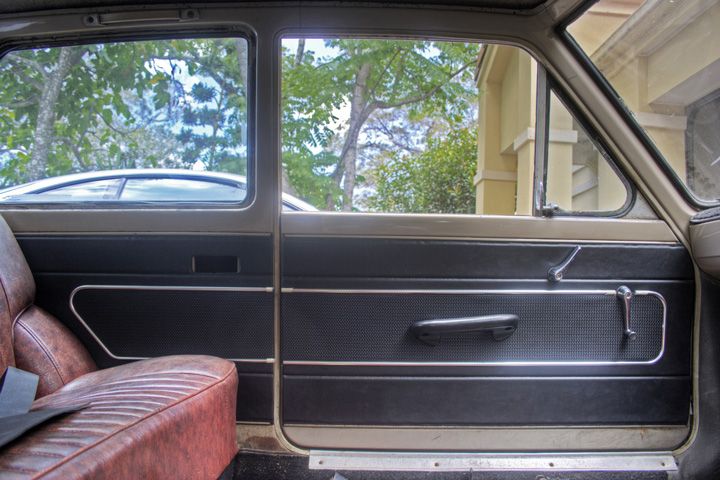
Considering that the door cards in the though are held down with several screws around the border and the window winder and door lever are in the middle, you have two seperate points in which to pin back the vinal.
 
If you still want to use glue and good trick that i have used is to apply the glue to the timber only. You are following the "wet application" method. Basically, you apply the glue to one side only, and press down the carpet ASAP, not letting the glue become tacky before contact.
This method gives you some time to reposition the carpet before it glues down hard. Also doing this in a cool place will slow the glue setting. IE in air-conditioning at this time of year. Its not critical, but it gives you more time to reposition the carpet is required, or to remove it totally if you completly mess it up.
 

  • Lay down on the timber/door card some 10-20mm dia lengths of dowel or similar spaced about 10cm apart. You use a fair few sticks, but anything clean will do the trick. (eg bamboo garden stakes) The idea is to keep the carpet and card seperate, blut as close as possible so that you can see the layout and reposition it but its not glued down.
  • Paste on the glue onto the card sparingly. Avoid the sticks as you dont want any glue on the carpet yet!
  • Then lay your carpet/vinal down over the sticks, glue and door card. This way the carpet is not contacting the glue (ie getting stuck) before you have positioned it correctly.
  • Make sure you are happy with the orientation and layout. Resposition as required, but be quick, you dont have much time as the glue begins to set quickly, particularly in the summer heat.
  • Start by removing the middle sticks, one at a time.
  • As you remove each stick, press down the carpet from the inside out. This will keep everything uniform and remove air bubbles.
  • Be careful not to strech the carpet as you push it down to the card. You will have some time to repostion, but not much.
  • Work you way to the edge of the card, pressing down the carpet.
  • Once at the edge, flip over the card and begin trimming and fixing the edges. If you are quick, you will be able to pull and strech the carpet to give a seamless finsih for the front.
  • As you do each section, flip back to the front to check its ok and keep going til you are done.
  • If you are doing vinal, then be careful on how much tension you apply as it doesent return easily back to shape. Easy, easy gentle gentle is the key with vinal. Carpet is much more forgiving.

 
Hope that helps some
It helps out alot.
 
I am learning alot as I do this.
I had read an article about DIY door cards and it mentioned "closed cell foam".


I didn't know what that was until now...
 
"An important division of solid foams is into closed-cell foams and open-cell foams. In a closed-cell foam, the gas forms discrete pockets, each completely surrounded by the solid material. In an open-cell foam, the gas pockets connect with each other. A bath sponge is an example of an open-cell foam: water can easily flow through the entire structure, displacing the air. A camping mat is an example of a closed-cell foam: the gas pockets are sealed from each other, and so the mat cannot soak up water."
http://en.wikipedia.org/wiki/Foam
 
I may look into a thin closed cell foam sheet.
 
I want these cards to be right.
 
Also... hopefully others can look back at this thread and learn from what has been said and done here.
1967 Datsun B10 2 Door.
Update time.
 
I went down to clark foam and rubber and bought some closed cell foam sheeting.
This stuff is way better for a noob like me, I can do anything I like with my glue and there are no problems.
 
This shows my card with the closed cell foam glued on, then strips cut off for my weld lines and reduced thickness where the card slides into the channels on my door.


Here is a comparrison between one card with vinyl and another without to show what these grooves do.


To get my weld lines to press into the grooves, I made up a weld line mould from some melamine and threaded rod.
I cut 1mm deep grooves into the melamine with a circular saw and then glued the threaded rod into these grooves with araldite.


The way my mould works is simple, just sit the card face down with the weld line grooves over the threaded rod, place another sheet ontop and press down with my datsun. (Rolling the wheel over the length of each threaded rod).
 
If I want the threaded rod to leave ribbed lines in the vinyl i'll need to do this with the work car. (2 x the wieght of my Datsun).


Next comes the Chrome, I used some aluminium battens from a roman blind.
This batten is made by a blinds component manufacturer called "Uniline"
https://docs.google.com/viewer?a=v&q=cache:4Fhu-qTQTv0J:www.uniline.com.au/_literature_131438/Parts_Catalogue_-_Roman_Blinds+Uniline+batten+aluminium&hl=en&gl=au&pid=bl&srcid=ADGEESiVh9G7QR64S0ruHyq7Bt8iejXf2wrSQBn1g2OwbBby_TlFT2lUvvEu0VGCk92Nj4yoVtuADld03e0Tq2Sx5xoEaEWQUndpIo-o56a-yOqatCab8yRMlBsGT1kreybyAlV_BgDz&sig=AHIEtbR5xpOCa4MLw22ez3h_dXGo1pknUA
 
The link above is the Google quick link on the first result from the search phrase"Uniline batten aluminium"
My brothers computer won't let him view the link, but mine will.
For those of you intereted in this, hopefully the search term will help if you can't view the link.
 
I just bent the batten around a 2.5 inch curve.
I traced around a 2.5 inch washer to make my bending template, and for the rear cards I used the washers for the last few degrees of bend.


I then cut off the rear section from my battens with a thin wheel blade on my grinder, and carefully drilled & threaded the batten so I could use 4mm grub screws with a nut and bolt to attach the battens.
(This is a test piece, the real batterns have the bolts lining up with the voids on the door frame).


Then It was time for some basket weave pattern vinyl to be glued ontop of my door trims and time to attach my chrome battens. (This pic was before gluing)


And the results are... (With a comparison to show old & new).


These are not perfect, im sure trimers will find flaws in what I have done, but for a first time ever trying to make door cards im extremely happy with what I have ended up with.
 
So now I guess I will have to do the other side.
 
I still need to cut the ends of the chrome pieces on the saw at work to create clean ends, and also mitre the chrome where the winder mounts for clearance.
So for now the Chrome still has tape on the ends so I know where to cut.
 
Also I still need to find 3mm uhpolstery staples, does anyone know who sells these?
1967 Datsun B10 2 Door.
Holy crap, you never mentioned chrome strips!
One minute youre talking foam-cell comparisons then BAM!!!...chrome strips!
 
Posts like that ^^^^ need to go into a legendary tutorial section or something... top work!
 
A couple of things to keep in mind when using thicker cards, they still need to bend into the channels...enough to clear the winder splines and the ashtray clips might need re-jigging...ever since I did mine they seem to self-eject good thing its a non-smoking vehicle...inside the cab at least
far out dude, that is awesome..
when does my sample sets show up!!!!! (VB10 remember) ha ha
nice there awesome, yea i didn't realise you were goin that far
Current Dato -
68 B20 ute project
Previous Datos -
68 B20 ute
68 B10 2dr sedan
ca18det 1200 ute 180rwkw
12a montser port 1200 ute 212rwhp
Stocko 1200 wagon
Thanks for the kind words.
 
I never mentioned the chrome as I already had that part figured out, And I wanted it to be a suprise.
 
The rear cards will need to curve towards the car to stop the cards from poping out the ash tray.
If you keep your card flat it will pop out the ash tray.
 
I hate those little clip things on door cards, I always break them.
My plan here is contact adhesive and a strip of velcro along the front edge, that way I just slide a plastic ruler along the velcro to seperate it, then slide the cards out with no fuss.
 
I know what you mean about thick cards being stiff, I made the cards a little shorter because of it so if I end up fighting the card it can atleast pop out with a little force.
1967 Datsun B10 2 Door.
Here is a pic of the cards in place.
1967 Datsun B10 2 Door.
there is some kind of mistake..
 
my Wagon is Red.... (happy with Black trims though) !!!
 
 
awesome work bro, they look great..
Always cutting corners  hahah
Looks perfect!
Had Dattos
200b x 2
1500 ute L20b 45mm webbers
1200 ute FJ20et 11.5@124.90 mph bad 60ft Built by me and Beetwenty
stocko 1200 ute
1000 ute project gone to a better home
Ash, how much for a set?
Golly! 
 
They look boss Ash! Ever thought of changing profession?  Hope so, cos now you have 3 sets on back order!!   
 
You can use the same templates for Mike and I, as the 2dr and VB are the same.  Well, they share the same part numbers at least!
When the "D" hits your eye, like a txt smiley guy...
I have just finished an indepth write up on what I have done.
This goes into more detail about what I did than what is covered in this thread.
http://www.datsun1000.com/TopicView.asp?TopicID=672
 
I am worried that If I made some for you guys that they would not line up from one car to another.
Also these take alot of time, im getting sick of glue fumes and sawdust.
 
Hopefully you can follow my build write up and have success of your own and maybe add some of your own ideas.
 
I bought the vinyl, basket weave vinyl and glue from NolanUDA.
 
Also the chrome battens were old stock from work, I used them up as we no longer make roman blinds, we buy them in now instaed. (I work in a blinds manufacturing company, so maybe im in the right profession eh?)
 
*On another note, I just happened to see a guy in an uhlpolsters work car today in the carpark, got talking to him and turns out one of the companys our work buys from sell 4mm staples. (That companys name is Shann).
1967 Datsun B10 2 Door.
as jim carey said "like a glove" but with way more finesse 
 
 
amazing work and love of the B10 more than well done!
During times of universal deceit, telling the truth becomes a revolutionary act, Big Brother is watching you - George Orwell 'Most Jews do not like to admit it, but our god is Lucifer -- so I wasn't lying -- and we are his chosen people. Lucifer is very much alive.'"  Harold Rosenthal http://www.thetruthseeker.co.uk/?p=24688
As it turns out, the winders on a 1000 require there to be almost nothing behind them, so foam or board behind the winder is probably not the best way of doing these if staying with the original 1000 winder handles.


The original cards are just vinyl with a super thin plastic ring glued to the rear of the vinyl and a plastic ring placed between the winder and the front face of the vinyl.


I have bought some winders from another unknown datsun model with more clearance (Hopefully).
I'll add pics of them here once they arive in the post and if they add the clearance I need.


So maybe my glove is a little wrong
1967 Datsun B10 2 Door.
35 Posts - Page: Previous | 1 | 2